As hunters, most of us carry a knife or two into the field.
Whether for peeling an apple or skinning a deer, it is important to keep that knife in top working order.
It is frustrating attempting to field dress an animal with a blunt knife. For this reason I prefer to always keep my knife razor sharp. Preparation is the key and once you have established an edge on your blade, it is relatively easy to maintain.
Most blades come direct from the factory with a basic hone, requiring refinement to obtain maximum sharpness and durability. Experts talk about desired angles for blade sharpness, however being short of having a protractor or blade guide in the field, this can be more confusing than useful.
There are many knife sharpening tools on the market, however none will get a knife sharper than one finely honed on a whetstone. I am going to explain a very simple, yet effective sharpening method taught to me as a child by my father.
In his youth, Dad worked exclusively on the boning floor of an abattoir, where a sharp knife was vital to the trade. This method is time proven and simple, ensuring an end to dull blades.
I would caution here that the angles used produce an incredibly sharp, but relatively delicate edge that cannot take abuse or neglect. However, experienced blademen who use a knife as intended will benefit from this column.
Prior to sharpening our hunting knife, it is important to use the correct honing stone to do the job properly. I prefer a double side rectangular whetstone with a course grit size of #1000 and fine grit size on the opposite side of #6000.
A combination of these grit sizes will allow you to shape and hone a knife edge suitable for field requirements. It is important to have a rectangular stone of about 20cm in length to maximise the effects of the sharpening method about to be explained.
I use the “pyramid” knife sharpening method, so called due to the number of sharpening strokes used through the process on the stone.
Firstly it is important to secure your honing stone to a bench or non-slip surface. I secure my stone by placing it in the vice on my work bench.
The next step is to lubricate the stone. I use my knife for skinning, gutting and preparing meat therefore preferring to lubricate my whetstone with olive or vegetable oils. These natural products will not contaminate your hard earned kill. You can of course use varying types of oils/lubricants depending on your knife’s purpose. Saliva works well in the field.
Once your whetstone is secured and lubricated, it is time to start the sharpening process on the coarse side of the stone.
Establishing angles for a butchering/skinning knife is important. These knives need to be sharp, so you need to hold your knife acutely to the stone.
To establish the correct angle, simply think of it as though you are peeling a carrot. To do this we are holding the blade at approximately 10 degrees from the stone. Remember the finer the angle, the sharper your knife will be.
Keeping these angles, draw the cutting edge towards you, utilising the entire length of the stone. Draw the knife blade towards you in an arching motion from rear to tip following the contour of the blade. Ensure that the length of the blade touches the stone during the drawing process.
On a blunt knife continue this 10 times on one side then flip the blade over. Doing this you will see that it is impossible to draw the blade towards you. On this side of the knife, the user will have to push the cutting edge away in an arching motion, again ensuring fine blade angle and that entire cutting surface of the knife comes into contact with the stone.
Repeat this action 10 times then flip the knife back over. Continue this draw/push process nine, then eight times and so on both sides of the blade until you reach five. At this stage flip the whetstone over to the finer #6000 side and repeat the process on each side of the knife until you reach zero.
If you have held your blade at similar fine angles on both sides during the honing process you should be able to shave the hairs off you forearm, indicative of a field-ready blade. Your knife should only need a final rub on a steel to give you the full benefits of a field ready knife.
Remember, a sharp knife is far less dangerous than a dull knife. Utilising this simple sharpening method will ensure your knife helps, not hinders, you in the bush.
Tips:
 1. By folding paper to an 11 1/2 degree angle, you have a template to manually sharpen knives very well.
 2. Ensure you maintain contact all along the cutting edge surface of the blade.
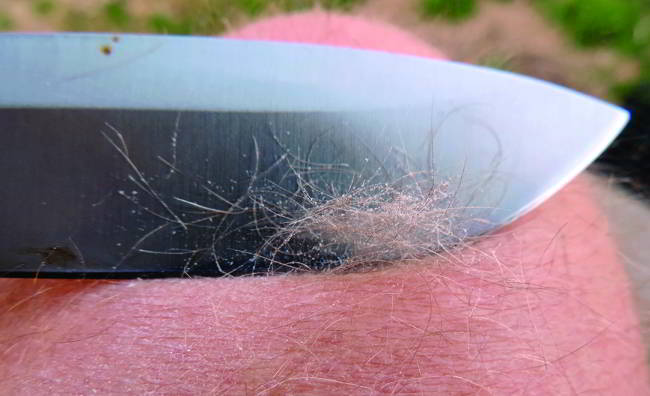 3. The proof of a sharp blade. It easily dry-shaves arm hairs.
Hunting tip: To get a near-10 degree angle to guide your knife to establish that primary bevel. Take a piece of paper and fold the corner in half, making a 45 degree angle. Then, fold in half again, making 22 ½ degrees. Next, you guessed it, fold the 22 ½ degree triangle in half again and you’ll have a near-perfect grind angle of 11 1/2 degrees.
This article was first published in the September 2014 issue of Sporting Shooter magazine.


0 Comments