
For many years my Lee Enfield rifle of choice for Service Rifle and long range was the World War 1 vintage No 1 Mk III* which had fulfilled its role admirably.
I’d also had a sporterised No 1 which had a small variable Tasco scope mounted on bases that required the receiver to be drilled and tapped. It was accurate enough for its intended purpose but didn’t set the world on fire, so I reluctantly sold it recently to make some room in my gun safe for a new condition No 4 Savage that had been bedded by a meticulous full bore shooter, zeroed and stored away for over thirty years. On a few excursions to shoot the new rifle at the range, I was getting good but not stellar accuracy, so I thought I may try to improve on it.
A couple of years ago, my mate Robert unpacked a beautiful, new 1950’s manufacture Fazakerly No.4 from its grease and commenced service shooting with it. Unfortunately, he was not getting great accuracy or consistency from it, experiencing unexplained horizontal stringing and 3-4 MoA groups on a good day. I’d mentioned to Robert that I had read of a method of stocking up the No.4 called “the Bisley Method”, so named because it was developed for full bore shooters in the 1950’s and was the only alternate bedding method, apart from standard factory, that was permitted to be used by the NRA of the UK in competition.
I had never bedded a rifle before and Lee Enfields are not as straightforward as a modern sporter to accurise, but I offered to hunt out the article, disassemble Robert’s rifle and have a go, if I felt confident. First up, the article came from an American NRA Booklet named “British Enfield Rifles” and was written by Major E.G.B. Reynolds and titled “Target Accuracy with the No. 4 Rifle”.
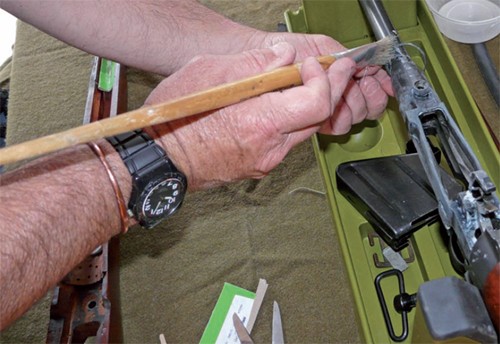
Application of the release agent – a most critical step to do properly if you don’t want your rifle glued together permanently. Don’t forget to treat the locator ring as well.
Among other handy snippets like honing bents on cocking pieces and keeping the nose cap clear of the foresight block, he detailed with easily interpreted diagrams (reproduced in this article) how to bed the No.4 to improve its performance.
One of the beauties of the No.4 receiver is that it lends itself to the secure attachment of “no-drill” mounting bases for riflescopes.
This means that the owner’s ageing eyes have a chance to truly evaluate the accuracy potential of the rifle without that troubling “variable” influencing the outcome. The absolute best such no-drill mounting system I know of is made by S&K in the USA and consists of two anchor points, the rear utilising the rear battle sight mounting holes and
the front using a clamp which exerts rearward pressure on the bevelled front of the charger bridge. This provides a rock-solid lock-up without having to mar the surface of the receiver, thereby preserving the rifle’s outward historical appearance and value.
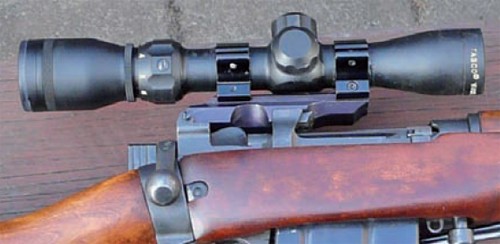
The beautifully simple and strong S&K no-drill mounts with a Tasco World Class 2-8 power scope mounted – a nice compact outfit.
The inside of the fore-end, however, is another story, because you must alter the timberwork therein to some degree to effect the Bisley bedding system. But back to Robert’s rifle. As I pulled it apart, the reason for its inaccuracy became suddenly apparent. One of the timber shoulders onto which the force of recoil bears at the very rear of the receiver (sometimes referred to as “the draws”), had cracked and separated, thereby allowing the force of the recoil to bear unevenly and on firing, quite understandably, to spray shots from side-to-side. Once I had repaired that shoulder with epoxy, I continued to alter the remaining bedding and the rifle has shot like a “.303 Varminter” ever since. It routinely groups MoA for five shots with handloads and had become a source of some envy amongst his fellow shooters, including your scribe.
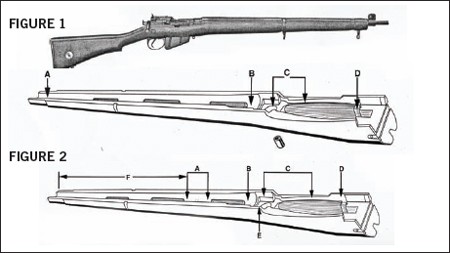
On to the Bisley method, but before we can understand this improvement, it behoves us to know how a No. 4 is bedded at the factory and that method’s attendant disadvantages. The standard factory bedding of the No.4 rifle consisted of ensuring the following points of contact, explained in Figure 1:
• 3-5 pounds upward pressure onto the muzzle.
• Under the knox-form or reinforce, just forward of the main takedown screw.
• Even contact on timber flush with the metal bedding pillar which surrounds the main takedown or “king” screw and travelling back a little way along the receiver rails.
• Even hard contact against the “draws”.
This is a fine and proven system of bedding that provides good accuracy but can be inconsistent over time, due to impact shifts inherent in bedding at more than one point along the barrel on timber, subject to swelling and shrinkage from moisture variations.
The Bisley bedding method – updated for the noughties. The deficiencies of the factory bedding are addressed by this technique which, in its infancy, used hardwood blocks inserted into the fore-end at one critical point. Inside the No. 4 fore-end the manufacturers scooped out three longitudinal lightening cuts, to ease the soldier’s load and possibly to dissipate heat, much like a modern fluted barrel of today. The heart of the Bisley method beds the barrel between the two rearmost lightening cuts and allows it to totally float from that point forward. (See Figure 2).
In this day of modern epoxies, hardwood blocks can be dispensed with and Brownell’s AcraGlass, Devcon or the Australian purposemade Arma-Grout, which I used this time, makes the job considerably easier. Instead of having to use bearing blue and endless assembly and disassembly with a fine chisel to get even bearing, the amateur “bedder” can simply spread some “goop” in his fore-end, press it down and let the rifle bed itself. If it were that easy, everyone would be doing it and things can go very wrong – I did glue a mate’s stock together irretrievably a few years ago, so take care and read the instructions on the pack.
The contact points are as follows and are where bedding compound should be applied:
• Between the centre and rear lightening cuts, so that the barrel rests on 1 to 1 1/2 inches of compound. From that point forward, the barrel free-floats.
• Then bed the reinforce (Knox-form) as in standard bedding,
• Around the king screw and all the way along the surfaces that support the receiver rails, further than standard.
• On the “draws”, again as in standard stocking-up.
Critical Information To Avoid Foul-Ups
Prior to mixing the epoxy, drill some small holes at regular intervals on those contact points, rub over with metho to degrease and give a light sand, so the epoxy has something to grip onto and stabilise.
With a flexible artist’s paintbrush or new cheap shaving brush (not grandad’s badger hair beauty) apply appropriate release agent to every metal surface that the bedding compound could possibly reach as per directions – and then do it again. If you don’t do this properly your rifle will stay assembled forever. Don’t forget to put release agent on the circular steel collar into which the back of the rear top timber cover fits – a trap for young players.
Dam neatly around the edges of where the bedding is to sit with plasticene or blu-tack so you do not have to trim too much hardened epoxy back when set.
Plug the King Screw hole in the base of the receiver with modelling clay and also the hole in the fore-end, where the metal bedding pillar sits and leave it slightly proud.
Using masking tape or cloth tape, seal off the top edges of the fore-end where bedding compound could conceivably flow.
Place three or four layers of hard card between the two rear lightening cuts, screw the barrelled action down with the King Screw and try and run a business card down the length of the barrel channel – if you can’t, trim away excess timber with a chisel and sandpaper until the card moves freely up and down from the muzzle to your temporary cardboard bedding.
After 1-6 above, mix your bedding compound and applying it to the appropriate places. Carefully put together the fore-end and barreled action MINUS the top handguards and trigger guard and secure with old bike inner tubes or octopus straps. This will save your King Screw from the possibility of being glued into bedding compound – not good!
If you find that the barrel is resting more to one side of its channel, you can correct this somewhat by putting some timber or cardboard shims along the tight side and the bedding should set the barrel more evenly in its channel.
Leave overnight with a bedside incandescent light playing on the bedding areas to provide gentle setting heat. After 24 hours, disassemble, clean up edges with a small chisel or craft knife and reassemble your rifle.
In Reynolds’ article, he mentions that the No.4 rifle, given good ammunition, is capable of consistent grouping inside 2 minutes of angle at any range from 200 to 1000 yards. Now, in the fifties, handloading was not common and shooters had to use what military ammo was available. Good Australian MF 57 and 58 headstamped ammo was nearly as good as the most consistent factory ammo ever made for the .303 and that was FN69, loaded with nitrocellulose propellant, not cordite. Old hands report great results with this ammo which has now gone the way of the dodo.
Never fear though, because Remington makes delightful unprimed brass, Sierra and Lapua make beautiful projectiles and ADI make AR 2209 and AR 2208. With these components assembled into some new handloads, I trotted out to Malabar one steamy Tuesday. I should mention that I had some new Sellier and Bellot .303 Factory ammo to play with as well.
A careful boresighting at home had resulted in my first shot nearly cutting the left edge of my 3/4 inch aiming circle at 100 metres. I proceeded to fire a few groups with different ammo. This is how they shot:
• Lapua .311 124gn FMJ Spitzer – three shots into .87 MoA.
• Sierra .311 174gn Match Kings – four shots into .547 MoA
• S&B Factory 180gn FMJ – three shots into .754 MoA
The details of the handloads (all using PM C Large Rifle primers) are as follows: 124gn Lapua FMJ .311 calibre projectiles= (intended for use in the 7.62×39 Russsian case) in HXP brass, full length sized and trimmed, in front of 46 grains of AR 2208. Average velocity – 2930fps – velocity variation highest to lowest was 30fps.
Sierra 174gn Hollow Point Boat Tail Match King .311 in Remington cases with 46gn AR 2209. Average velocity was 2470fps (30fps above factory spec with variation of 20fps apart from one which came out at 2565fps). S&B Factory 180gn FMJ load. Average velocity 2465fps – variation about 40 fps.
Note: All loads were shot through a basic Chrony chronograph twenty feet from the muzzle.
Apart from anything else that short test proved the following:
The handloads were pretty good. The S&B Factory load was very good. The rifle is bedded so no stress is affecting it – if a boresighting can get you that close, that indicates a tight stress-free bedding that allows the rifle to shoot consistently.
This article was first published in Guns Australia, July/September 2010.


0 Comments